Winter is approaching fast for some of us and that means frosty looks! I'm so excited to share this ice blue eye look with you! I lost some "footage" if-you-will between uploading the photos from camera to laptop so you'll have to bare with why my lip routine isn't on here. I would love to see your recreations of this arctic eye in the comments! (Products listed at the end.)
Don't forget, I'm on Facebook! Click the Facebook button at the top of the blog to go straight to the page and "like" it to stay in touch with me. All of my social media links are available in the header. Thanks for stopping by! I love you all! xo
So fresh and so clean clean! Just did my hair and I'm ready for some icy makeup to bring on this winter!
I took the Essence I Heart Stage shadow base and primed my lids. I also used an e.l.f. cream shadow as a base in my crease where I will later apply a deep blue - since the cream shadow is a dark coordinating blue, it will make the crease color pop! In my case, I actually came back with that cream shadow for my crease color.
Using this ice blue from my Sedona Lace 88 Matte palette I applied it to the outer two-thirds of my lid.
Make sure to use a flat shader brush so your pigmentation is bold. As you can see, I left my inner corner area naked so I can apply a frosty pigment to really amplify the winter theme.
Using a silvery white mineral pigment I applied it heavily to my inner corner and then lightly to my brow bone. As you can see, the pigment looks just like snow!
The iciness is really taking effect now!
Using SHATTERED from my Urban Decay Ammo palette I applied it to the crease and blended it into the light icy blue on the lid to add depth.
And now for the cream shadow again! It's a deeper blue but still pearly so it works with this look. (Yes, this is a photo from earlier on but at least you get to see the cream shadow.)
I applied it with a small shader brush so I could control if I wanted it thick or thin in the crease. Make sure to really blend this in with a dense blending brush once it's applied to keep it from creasing. You'll want to "seal" it with a coordinating color as well to help prevent creasing during the day.
I took the silvery-white pigment and applied it on my bottom lashes in the inner corner and took the Shattered shadow from the Ammo palette and worked it in on the remainder of my lower lashes.
My FAVORITE black cream liner and a small angled brush! (You've seen this before so I skipped this step in the photos.) I didn't wing it this time as I wanted the color and the false lashes to be the focus.
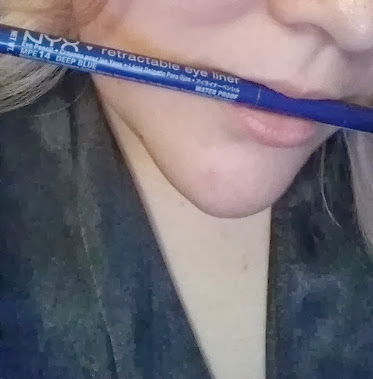
I only lined my top lid with the black liner. I chose to use this retractable navy liner for my bottom lashline to smoke out the look and add more color. We're going for a blustery winter look so I thought it would be appropriate to add some more blue!
These are the eyes with all of their color! I love how deep it looks around the lashes! Don't forget those brows! I used a clear brow gel just to tame them a bit.
I picked up these lashes at ROSS for only $2.99 and thought they would add just the right amount of drama to this bold look! Don't you agree? :) I used the bottom pair - it doesn't look like it here but they are softer in the center and get longer and thicker towards the outer corner.
I used a basic lengthening mascara for my top lashes to darken them so they don't stand out under the falsies. Unfortunately, the application of the falsies were some of the photos that were lost! I will absolutely take photos again next time and make SURE they're in here! :P
After the falsies, I used the same lengthening mascara on my bottom lashes and applied my concealer. I have no idea why I love this concealer SO much but it's just the perfect shade for me. And it's so affordable! Okay so maybe that's why I love it so much! This little pot goes a long way - I use it every time I wear makeup and yet it still looks brand new. 10 points to Gryffindor Essence cosmetics!
For this look I wanted a soft pink cheek so I used NYX Pinched blush and applied it lightly to the apples of my cheeks.
I lined my lips with Rimmel London's Exaggerate liner in Eastend Snob (my favorite neutral pink liner) and applied a nude lipstick on top. Finished the lip off with NYX Butter Gloss in Vanilla Cream Pie and...
PA-POW!
FINISHED LOOK! I am obsessed with this look for December!
e.l.f. Cream Shadow in Teal Party
Sedona Lace 88 Matte Palette
e.l.f. Mineral Loose Eyeshadow in Angelic
Shattered from the Urban Decay Ammo Palette
e.l.f. Cream Liner in Black
NYX retractable liner in Deep Blue
NYC Instant Lash in Black
Generic False Eyelashes
Essence Match 2 Cover Concealer
NYX Blush in Pinched
Naked Illuminated Highlight
Rimmel London's Exaggerate liner in Eastend Snob
Wet n Wild Bare It All Lipstick
NYX Butter Gloss in Vanilla Cream Pie
Please please please recreate this and show me the photos! I want to see them! Thanks for reading! Until next time...
xo K


No comments:
Post a Comment