


This beauty is one of the prettiest festive color combos I've ever seen in a drugstore makeup palette! Get on with your bad self, Fergie! You knocked it out of the park with these colors! The Desert Festival palette is full of golds, oranges, and browns and it is simply perfect for Thanksgiving this year. You get a matte cocoa brown in the center, a taupe pearlescent highlight, a bright burnt orange, golden orange, and a deep chocolate brown with amazing gold specks in it! I bought mine from Walmart for $6. Enough with the jibber jabber Kelly... onto the tutorial!
PRODUCTS LISTED AT THE END!

The two matte shades are the deep orange in the top right and the center brown. The highlight has a perfect pearly sheen, as does the golden orange in the bottom left. The dark brown has flecks of gold! Oh my goodness, it's beautiful!

After washing my face, I moisturized with my intense hydrating lotion from Dollar General. I have tried this one AND Ponds and it's the same thing. I even looked at the ingredients. Same thing, half the price. This is some serious stuff if you have very dry skin like I do! I recommend giving it a go. Only thing I am not 100% loving is the smell - it's like a baby lotion scent but it's just not my thing. It would be better in my opinion if it were unscented.

I Heart Stage eye primer! Seriously, try it if you can get your hands on it. I've said this in other blogs, but the only place in my area to supply Essence is Ulta and they are so affordable and outperform some of my bigger brand products! I've used this primer for a few months now and it doesn't crease at all! I go way beyond a typical time frame of wear without any movement of my shadow and the color pigmentation stays bold.

LET'S GO!

Of course, I applied the pearly taupe highlight in this palette to my brow bone. It's very light when you're applying with a brush so I went kind of heavy. Downfall to some light colors, they don't have much color payoff. I applied the light golden orange to the outer two-thirds of my lid very heavily. Using a blending brush, I added the darker orange from the palette to my crease to build the emphasis. I love it! It looks like the most perfect sunset as it blends together. I went in with the taupe in the inner corner as well, this is optional and you'll see why in the next step.

Using my NYX loose pigment I applied it densely to the inner corner and a bit right under the brow bone. I didn't want the highlight to be too shimmery so I kept it at a minimum by the brow.
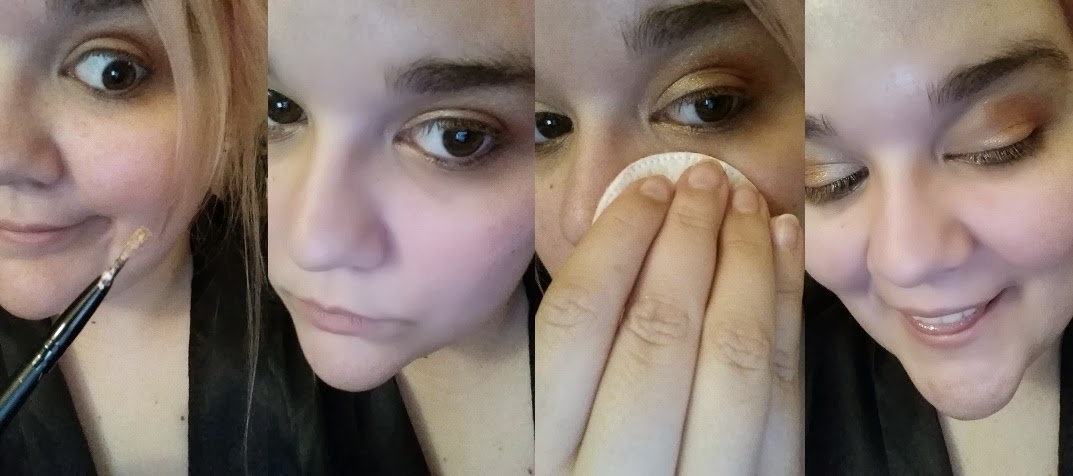
After applying the loose pigment you'll want to wipe away any excess that's falling on your cheeks. Keepin' it clean!

Now for the drama! Add the dark brown to your crease VERY gently and a little at a time! Build the drama so you don't go overzealous right away. It's easier to add color then to take it off. And remember, BLEND BLEND BLEND!

Once the dark brown was on my crease how I wanted it, I added the deep orange into the brown again to just blend those two colors together. I was playing with the colors and how they meshed together. Man, I love this palette so much!

LINER! I chose a soft pencil liner for this look. Not soft in tone, soft in texture. The NYX Slide On Glide On liners are super smooth!

I lined the bottom lashes and used the brown shadows to smudge it out while I lined the top lashline neatly. I sealed that with a powder to make sure it didn't transfer to the upper lid when my eyes were open.

Smudge smudge smudge. Yeah, it's an odd brush but I didn't know what to do with it and whatdayaknow, smudging worked pleasantly well with this little guy.

Go ahead and forget your mascara like I did - doh! I concealed with my Maybelline Dark Circle Eraser and added in a bit of my Essence Match 2 Cover concealer to lighten it up.

After concealing, I set the liquid with my translucent powder and added blush! I stuck with a pearly blush for this look that way my cheeks had a nice reflect of the lights. I also used my Naked Illuminated highlighter on the tops of my cheeks.

Oh nooow you remembered the mascara, Kelly. Good goin'! Hey, better late than never! Lashes and brows, check!

My lips were one of my favorite parts of this look! I took a deep vampy red and added it to the corners of my mouth and left the center open. I then came in with a deep red from Wet n Wild that was lighter than the corner color to add depth and make it custom. I then lined my lips with my Coloricon liner and went back in at the end to deepen that darker red. When doing an ombre look like this make sure to rub your lips together to get the two (or three) colors to blend a bit and not look harsh.


Kisses! All done! I am so proud and happy with how it turned out! This is most definitely a look I'm going to wear for Thanksgiving and during December. I really hope you enjoyed! Comment with any feedback - thanks for reading!
.jpg)
PRODUCTS USED:
DG Dry Skin Cream
Essence I Heart Stage Eye Primer
Wet n Wild Fergie Palette in Desert Festival
NYX Ultra Pearl Powder in Mink
NYX Slide On Glide On Liner in Brown Perfection
Essence Clear Brow Gel
Jordana Best Lash Extreme in Black
Maybelline Age Rewind Dark Circle Reducer in Fair
Essence Match 2 Cover Concealer
e.l.f. Translucent Matifying Powder
e.l.f. Studio Blush in Candid Coral
Urban Decay Naked Illuminated
e.l.f. Lip Exfoliator
NYC Lipstick in Mahogany
Wet n Wild Lipstick in Cherry Picking
Wet n Wild Coloricon Liner in Berry Red
xo K
No comments:
Post a Comment